工具及技术框架
智能合约编写工具:Remix,个人喜欢用remix写智能合约,写好智能合约直接部署测试,把写好的合约代码再放到拷贝出来放到项目中进行编译
前端页面编写工具:vscode
环境:node:v14.17.0、npm:6.14.13
依赖包:"ganache-cli": "^6.12.2", "solc": "^0.4.22","web3": "^1.3.6"
关于几个依赖包的简要介绍:
Ganache CLI
Ganache CLI是以太坊开发工具Truffle套件的一部分,是以太坊开发私有区块链的Ganache命令行版本,用于测试和开发的快速以太坊RPC客户端,用于测试和开发的快速以太坊RPC客户端。ganache-cli是用Javascript编写的,并通过npm作为Node包进行分发。安装之前首先要确保安装了Node.js(> = v6.11.5)。
旨在快速搭建一个小demo,就没有用geth客户端去搭建一个本地私有链,直接用Ganache建一个干净纯粹的模拟节点进行测试,跟在Remix上用JavaScript VM测试合约是一个原理
solc
solidity编写的以太坊智能合约可通过命令行编译工具solc来进行编译,成为以太坊虚拟机中的代码。solc编译后最终部署到链上形成我们所见到的各种智能合约。
web3
web3.js是一个库集合,你可以使用HTTP或IPC连接本地或远程以太它节点进行交互。 web3的JavaScript库能够与以太坊区块链交互。 它可以检索用户帐户,发送交易,与智能合约交互等。
以上的三个依赖包具体的信息就不详细介绍
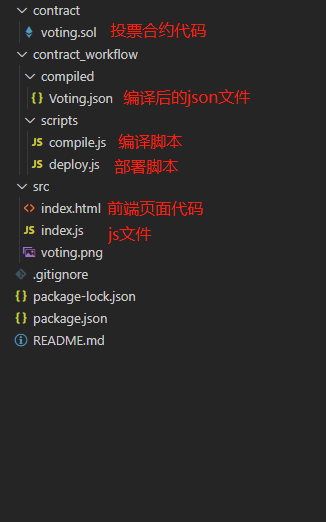
工程结构
首先使用node init初始化一个node项目,这里取名字为simple_voting_dapp
项目根目录安装依赖:npm i ganache-cli@6.12.2 solc@0.4.22 web3@1.3.6
安装完成后package.json应该是如下信息
1
2
3
4
5
6
7
8
9
10
11
12
13
14
15
16
| {
"name": "simple_voting_dapp",
"version": "1.0.0",
"description": "",
"main": "index.js",
"scripts": {
"test": "echo \"Error: no test specified\" && exit 1"
},
"author": "",
"license": "ISC",
"dependencies": {
"ganache-cli": "^6.12.2",
"solc": "^0.4.22",
"web3": "^1.3.6"
}
}
|
接着创建如下目录结构及代码
投票合约
本例子中的投票合约是一个非常简单的合约,代码如下:
1
2
3
4
5
6
7
8
9
10
11
12
13
14
15
16
17
18
19
20
21
22
23
24
25
26
27
28
29
30
| pragma solidity ^0.4.22;
contract Voting {
bytes32[] public canditateList;
mapping (bytes32 => uint8) public votesReceived;
constructor() public {
canditateList = getBytes32ArrayForInput();
}
function validateCandidate(bytes32 candiateName) internal view returns(bool){
for(uint8 i = 0;i<canditateList.length; i++){
if(candiateName == canditateList[i])
return true;
}
return false;
}
function vote(bytes32 candiateListName) public payable returns(bytes32){
require(validateCandidate(candiateListName));
votesReceived[candiateListName] +=1;
}
function totalVotesFor(bytes32 candiateName) public view returns(uint8){
require(validateCandidate(candiateName));
return votesReceived[candiateName];
}
function getBytes32ArrayForInput() pure public returns (bytes32[3] b32Arr) {
b32Arr = [bytes32("Candidate"), bytes32("Alice"), bytes32("Cary")];
}
}
|
变量说明:
canditateList:投票的对象
votesReceived:投票的对象—>获得的总票数。一个映射
构造函数:
调用getBytes32ArrayForInput函数初始化三个投票对象至canditateList中
函数
validateCandidate:一个internal、view的函数,返回目标是否在投票对象列表中
vote:给制定投票对象进行投票
totalVotesFor:查看指定对象的获得票数
编译脚本compile.js
1
2
3
4
5
6
7
8
9
10
11
12
13
14
15
16
17
18
19
20
21
22
23
24
25
26
27
| const fs = require('fs-extra');
const path = require('path');
const solc = require('solc');
const compiledDir = path.resolve(__dirname, '../compiled');
fs.removeSync(compiledDir);
fs.ensureDirSync(compiledDir);
const contractPath = path.resolve(__dirname, '../../contract',
'voting.sol');
const contractSource = fs.readFileSync(contractPath, 'utf8');
const result = solc.compile(contractSource, 1);
if (Array.isArray(result.errors) && result.errors.length) {
throw new Error(result.errors[0]);
}
Object.keys(result.contracts).forEach( name => {
const contractName = name.replace(/^:/, '');
const filePath = path.resolve(__dirname, '../compiled',
`${contractName}.json`);
fs.outputJsonSync(filePath, result.contracts[name]);
console.log(`save compiled contract ${contractName} to
${filePath}`);
});
|
部署脚本deploy.js
1
2
3
4
5
6
7
8
9
10
11
12
13
14
15
16
17
18
19
20
21
22
23
24
25
26
| const path = require('path');
const Web3 = require('web3');
const web3 = new Web3(new Web3.providers.HttpProvider('http://localhost:8545'));
const contractPath = path.resolve(__dirname, '../compiled/Voting.json');
const { interface, bytecode } = require(contractPath);
(async () => {
const accounts = await web3.eth.getAccounts();
console.log('部署合约的账户:', accounts[0]);
console.time('合约部署耗时');
var result = await new
web3.eth.Contract(JSON.parse(interface))
.deploy({data: bytecode})
.send({
from: accounts[0],
gas: 1500000,
gasPrice: '30000000000000'
})
.then(function(newContractInstance){
console.log('合约部署成功: ' + newContractInstance.options.address)
});
console.timeEnd('合约部署耗时');
})();
|
部署合约
1.手动启动ganache程序,运行一个节点,保持终端不关闭
.\node_modules\.bin\ganache-cli
2.编译voting.sol投票合约
node .\contract_workflow\scripts\compile.js
contract_workflow目录下面会出现Voting.json文件,后面index.js会用到该文件中的内容
3.部署合约
node .\contract_workflow\scripts\deploy.js
会出现以下信息
部署合约的账户: 0x8C6ba0616f05909eCb334C1a3707C38a8d7bDd0F
合约部署成功: 0xaCCBC818BC9224A6da2902eeF82c3d14afC82aB5
合约部署耗时: 345.211ms
网页交互代码index.html
1
2
3
4
5
6
7
8
9
10
11
12
13
14
15
16
17
18
19
20
21
22
23
24
25
26
27
28
29
30
31
32
33
34
35
36
37
38
39
40
41
42
43
| <!DOCTYPE html>
<html>
<head>
<title>Voting DApp</title>
<link href='https://maxcdn.bootstrapcdn.com/bootstrap/3.3.7/css/bootstrap.min.css' rel='stylesheet' type='text/css'>
</head>
<body class="container">
<h1>A Simple Voting Application</h1>
<div class="table-responsive"></div>
<table class="table table-bordered">
<thead>
<tr>
<th>Candidate</th>
<th>Votes</th>
</tr>
</thead>
<tbody>
<tr>
<td>Candidate</td>
<td id="candidate-1"></td>
</tr>
<tr>
<td>Alice</td>
<td id="candidate-2"></td>
</tr>
<tr>
<td>Cary</td>
<td id="candidate-3"></td>
</tr>
</tbody>
</table>
</div>
<input type="text" id="candidate" />
<a href="#" onclick="vote()" class="btn btn-primary">Vote</a>
</body>
<script src="https://cdn.jsdelivr.net/gh/ethereum/web3.js/dist/web3.min.js">
</script>
<script src="https://code.jquery.com/jquery-3.1.1.slim.min.js">
</script>
<script src="./index.js"></script>
</html>
|
网页交互index.js
要注意contractAddr和abi两个变量的值,
contractAddr是在部署合约时获取的
abi是从Voting.json中的interface获取的,打开Voting.json即可看到interface对象内容
1
2
3
4
5
6
7
8
9
10
11
12
13
14
15
16
17
18
19
20
21
22
23
24
25
26
27
28
29
30
31
32
33
34
35
36
37
38
39
40
41
42
43
44
45
46
47
48
49
50
51
52
53
54
|
const web3 = new Web3(new Web3.providers.HttpProvider("http://localhost:8545"));
contractAddr = "0xaCCBC818BC9224A6da2902eeF82c3d14afC82aB5";
abi = ""
contractInstance = new web3.eth.Contract(JSON.parse(abi),contractAddr);
candidates = { "Candidate": "candidate-1", "Alice": "candidate-2", "Cary": "candidate-3" };
let accounts;
web3.eth.getAccounts().then(result => accounts = result);
function vote() {
let candidateName = $("#candidate").val();
try {
contractInstance.methods.vote(stringtoHex(candidateName)).send({from: accounts[0] })
.on('transactionHash', function(hash){
console.log("hash:" + hash)
contractInstance.methods.totalVotesFor(stringtoHex(candidateName)).call().then(result => $("#" + candidates[candidateName]).html(result));
})
.on('confirmation', function(confirmationNumber, receipt){
})
.on('receipt', function(receipt){
})
.on('error', console.error);
} catch (err) {
console.log(err)
}
}
var stringtoHex = function (str) {
var val = "";
for (var i = 0; i < str.length; i++) {
if (val == "")
val = str.charCodeAt(i).toString(16);
else
val += str.charCodeAt(i).toString(16);
}
return "0x"+val
}
$(document).ready(function () {
candidateNames = Object.keys(candidates);
for (var i = 0; i < candidateNames.length; i++) {
let name = candidateNames[i];
contractInstance.methods.totalVotesFor(stringtoHex(name)).call().then(result => $("#" + candidates[name]).html(result));
}
});
|
在本地打开src/index.html,出现以下界面
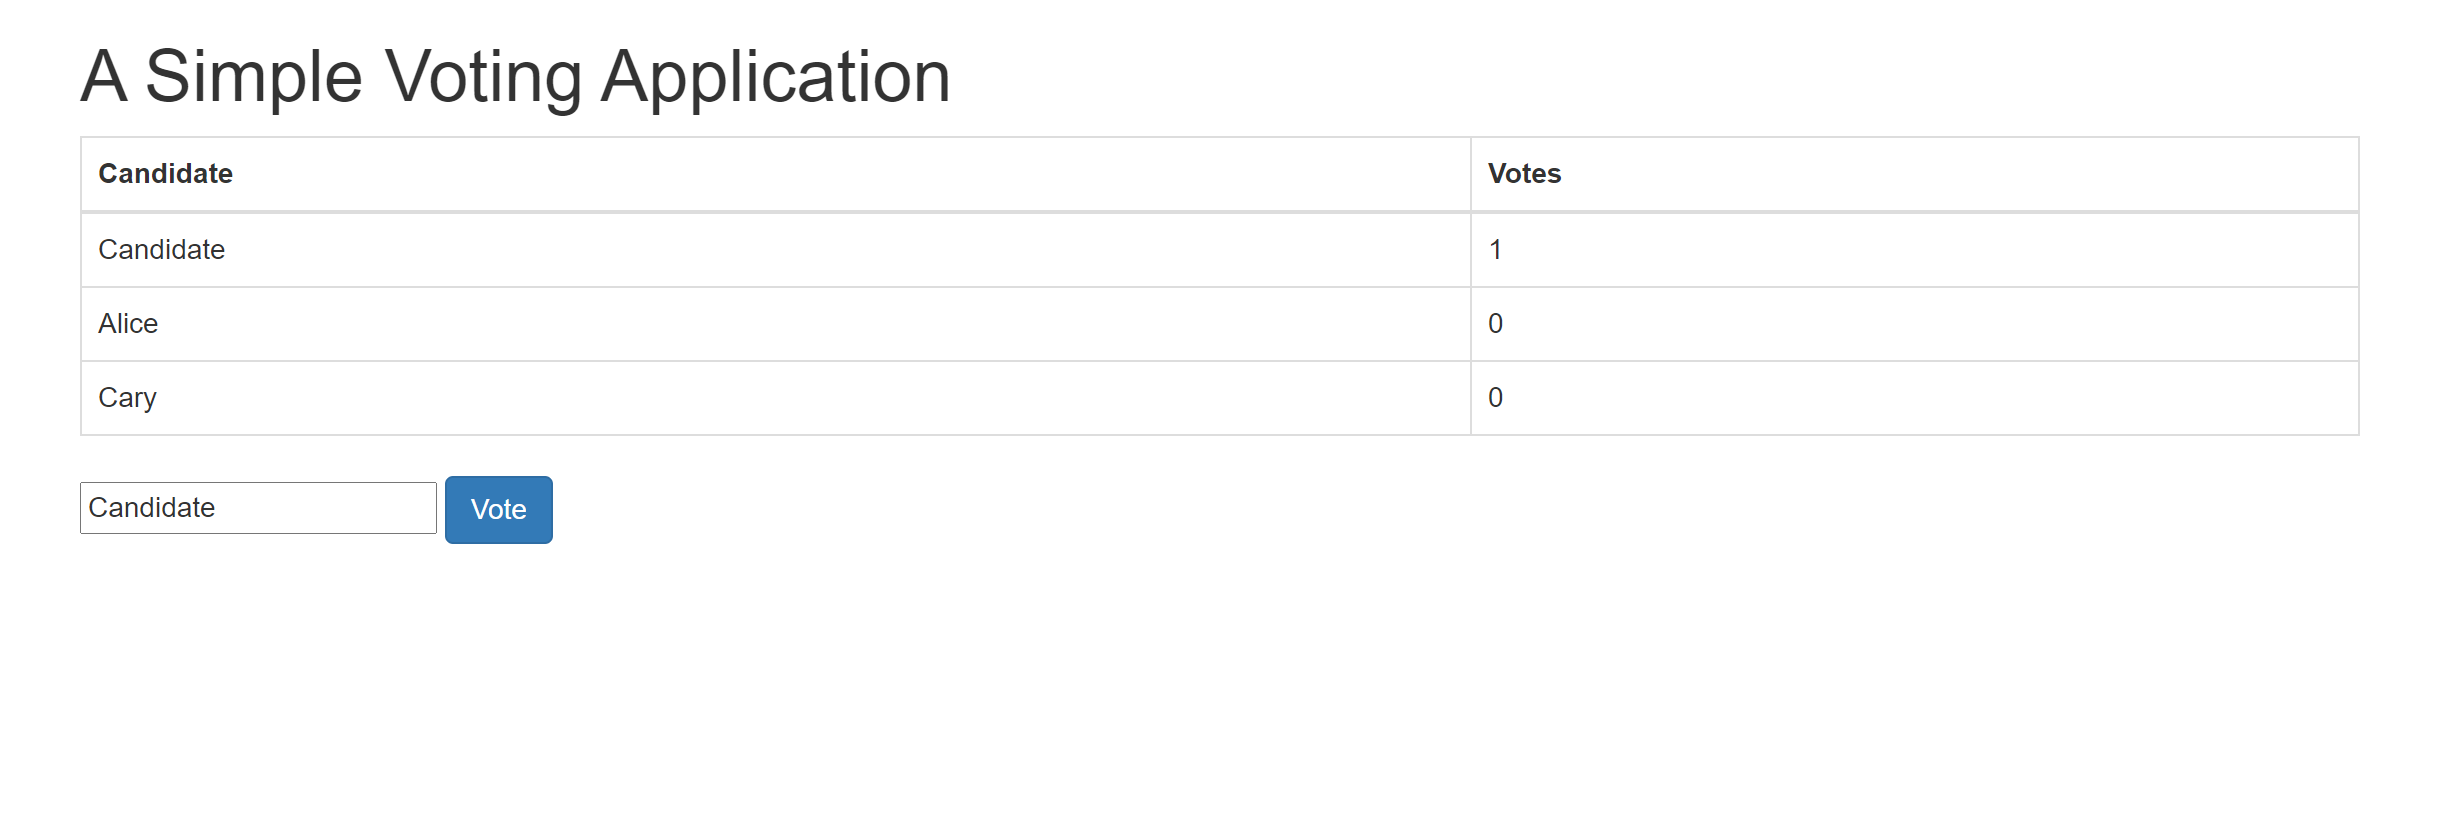
在输入框中输入对应投票对象的名字,点击Vote按钮即可为指定对象增加票数
至此,一个完整的demo就完成了!!
小结
本项目是一个比较基础的区块链demo,但是还有很多要优化的地方
- 基于ganache启动的节点在关闭后,需要重新部署合约
- 部署合约编译部署分为了两步,很繁琐
- 部署合约后要手动修改index.js中合约地址和abi
所以自动化的流程还是比较繁琐的
但是通过这个小demo,可以学到的东西还是很多的,比如如何用node通过ganache启动一个本地私有节点、如何编译合约、部署合约、调用合约
后期会介绍一个更自动化、更简便的框架Truffle去实现以上步骤,通过Truffle框架把以上很多编译,部署的脚本都帮我们完成了,所以学了这个demo后,学习truffle会更加得心应手
感谢
感谢尚硅谷的区块链教程:https://www.bilibili.com/video/BV1NJ411D7rf